
Brake Maintenance for Four-Wheeled Walkers: Keep Your Rollator Safe and Reliable
Brake maintenance for four-wheeled walkers keeps your rollator stopping and locking reliably so everyday walking feels safer.
You know what is a little too ironic? The one safety feature that is supposed to prevent falls on a four-wheeled walker is often the most ignored. I am talking about the brakes. And if you have ever squeezed a rollator hand brake and felt it go soft, slippery, or weirdly uncommitted, you know the exact stomach-drop moment I mean.
Brake maintenance for four-wheeled walkers is not a fussy hobby for people who love tools. It is basic safety. It is the difference between steady control and that split second where the walker starts rolling and your brain goes, “Well…this is not ideal.” I have seen plenty of folks make the same mistake: they assume brakes slowly getting weaker is just how rollators are. Nope. That is just brakes asking for attention.
I am going to walk you through what I have learned from checking rollators for family, helping friends tune up “brand new” walkers that were not adjusted correctly out of the box, and watching how quickly small brake issues can turn into big confidence issues. The good news is that brake maintenance for four-wheeled walkers is mostly simple. You do not need to be mechanically gifted. You just need a quick routine and a willingness to take the brakes seriously.
Why Brake Maintenance Is Non-Negotiable
Here is the straight talk: if a rollator does not reliably slow down and lock in place, it is not fully safe.
When brakes fail, people cannot control speed on slopes, cannot stop smoothly, and cannot lock the walker before sitting down. Those are not rare situations. Those are Tuesday.
And this is not just a hunch. The U.S. Consumer Product Safety Commission has long tracked walker-related injuries through national injury surveillance (NEISS). Their data summaries show that walker injuries among older adults are common and often happen during everyday activities like walking and transfers, not just dramatic falls down a hill. That is exactly where brake maintenance for four-wheeled walkers earns its keep: ordinary moments.
I remember visiting a friend’s mom who was proud of her new rollator. It was shiny. It had a seat. It had a bag. It had the whole “I am set” vibe. Then I squeezed the brakes and they barely engaged. She had been using it for months and thought that was normal. We adjusted the cable tension and her eyes got wide. She said, “Oh wow, that actually stops.” Yes. That is the point. But you cannot benefit from brakes you do not trust.
Brake issues also sneak up because they change slowly. One day the brakes feel a little loose. A few weeks later the lock does not hold. And then someone tries to sit down while the rollator gently rolls away like it is late for an appointment. Not funny in real life.
Understanding How Rollator Brakes Work
Before we get into the maintenance steps, it helps to understand what you are dealing with. Most four-wheeled walkers use one of two brake systems.
Cable-Operated Brakes
These are the most common. They work a lot like bicycle brakes. When you squeeze the hand levers, a cable pulls the brake mechanism at the wheel and the brake pads press against the wheel to create friction. That friction is what slows you down.
Cable brakes usually have a push-down lock feature. You push the levers down and they stay engaged, locking the wheels in place. That lock is not optional. It is what makes sitting on the rollator seat and standing still much safer.
Direct-Pressure Brakes
Less common but still out there, these brakes apply pressure directly to the wheel without long cable runs. They can be simpler mechanically, but they may feel different and may have fewer adjustment points.
For this article, I will focus mainly on cable-operated brakes because they are the most common and the ones people usually need help maintaining.
Weekly Brake Checks: Your Safety Routine
I am a big fan of making brake checks a weekly habit. Same day, same time, so it becomes automatic. Sunday morning with coffee, right before a weekly outing, or after you get home from a longer walk. Whatever actually happens in your real life.
Brake maintenance for four-wheeled walkers does not need to be complicated. You are not rebuilding a machine. You are doing a quick safety scan.
The Squeeze Test
This is your first line of defense. Squeeze both hand levers firmly and pay attention to:
Resistance: The levers should offer steady, consistent resistance. If they feel mushy, loose, or travel all the way to the handlebar, something is off.
Symmetry: Both levers should feel similar. If one is much tighter or looser, you can end up with uneven stopping, which is the kind of surprise nobody asked for.
Stopping power: With the brakes engaged, try to push the rollator forward. It should resist strongly. If it rolls easily, your brakes are not doing their job.
One real-world note: many seniors, especially those with arthritis, may not have the hand strength to really test this. If that is the case, have a family member or caregiver do the squeeze test. This is not about pride. This is about safety.
The Lock Test
Push both brake levers down into the locked position. They should set and stay there without you holding them.
Then:
Try to push the rollator forward and backward. It should not move.
Confirm both wheels are locked, not just one.
Release the locks by pulling up on the levers. They should release smoothly and fully.
If the locks do not engage reliably, or if they slip, treat it like a serious issue. A rollator that will not lock is not something you should sit on.
Visual Inspection
Look at the brake mechanisms near the wheels. You are checking for obvious wear and damage.
Check for:
- Brake pads: Are they worn down? Are they contacting the wheel properly?
- Cables: Any fraying, kinks, or rust?
- Cable housing: Cracks, splits, or crushed sections?
- Hardware: Loose screws or bolts?
This takes a couple of minutes. And it is exactly how brake maintenance for four-wheeled walkers stays easy instead of turning into a bigger repair later.
Common Brake Problems and How to Fix Them
Most rollator brake problems fall into a few familiar categories. Brake maintenance for four-wheeled walkers is often just identifying which one you are dealing with and making a small adjustment.
Problem 1: Loose or Spongy Brakes
You squeeze the levers, but they feel loose and the rollator does not stop strongly.
Cause: Brake cables stretch over time. That is normal, especially during the first months of use.
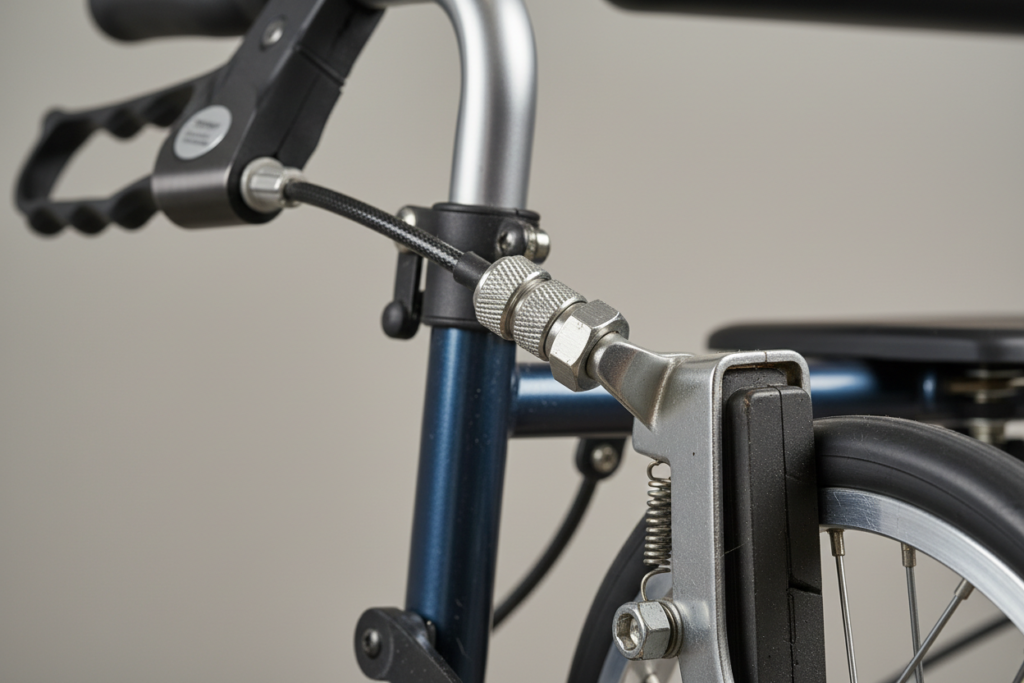
Solution: Adjust cable tension. Many rollators have an adjustment barrel where the cable meets the brake lever or near the wheel brake mechanism.
How:
- Locate the adjustment barrel.
- Turn it counterclockwise to tighten the cable.
- Test the brakes after small turns.
- Stop when the brakes feel firm and responsive.
If the barrel is maxed out and the brakes still feel loose, the cable may be stretched too far or the pads may be worn. That is a good time to consider replacement.
Problem 2: Brakes Will Not Lock
You push the levers down, but they will not stay locked, or they pop back up.
Cause: Cable tension may be too loose, or the locking mechanism may be dirty or worn.
Solution: First, tighten the cables.
If that does not work, inspect the locking mechanism on the brake levers. Dirt can prevent a full lock.
Wipe it with a dry cloth. If you have compressed air, a quick burst can help.
If the lock looks cracked or worn out, replace the brake lever assembly.
Problem 3: Uneven Braking
One brake feels strong and the other feels weak.
Cause: Uneven cable tension or uneven pad wear.
Solution: Adjust the weaker side to match. Then check pads. If one pad is much more worn, replace both pads so braking stays balanced.
Problem 4: Squeaking or Grinding Noises
The brakes work, but they are loud.
Cause: Dirt on the pads or wheel surface, or pads worn so far the metal backing contacts the wheel.
Solution: Clean pads and wheel contact surfaces with rubbing alcohol and a clean cloth. If noise continues, inspect the pads. If you see metal, replace pads immediately.
Problem 5: Brakes Drag Constantly
The rollator is hard to push because the brakes are rubbing.
Cause: Cables too tight or pads misaligned.
Solution: Loosen the cable tension slightly by turning the adjustment barrel clockwise. Then check pad alignment so pads sit close to the wheel but do not touch when brakes are not engaged.
When and How to Replace Brake Cables

Even with good brake maintenance for four-wheeled walkers, cables wear out. A common lifespan is around one to two years with regular use, depending on terrain and weather.
Signs You Need New Cables
- Visible fraying or broken strands
- Rust or corrosion
- Cables will not stay adjusted
- Kinks or sharp bends
- Cable housing is cracked or split
- Replacing cables is not impossible, but it does take patience and the correct parts.
General steps:
- Get the right cables. Check your rollator manual, or bring the old cable to a medical supply store.
- Remove the old cable. Loosen the adjustment barrel, disconnect the cable at the wheel mechanism, and pull it through.
- Thread the new cable through the housing and attach it at the wheel.
- Adjust tension and test often.
- If you trim excess cable, use proper cutters and add a cable end cap so it does not fray.
- If any of this feels uncomfortable to do, that is completely fair. Many medical supply stores and mobility equipment services can do it quickly.
My rule is simple: if you are not confident, pay someone who is. Brake maintenance for four-wheeled walkers is not the place to learn by guessing.
Replacing Brake Pads
Brake pads wear down over time. How fast depends on how often the rollator is used and where.
How to Tell When Pads Need Replacing
- Pad material looks thin, roughly less than one eighth of an inch
- Metal backing is visible
- Braking performance drops even after cable adjustment
- Pads look glazed or hardened
Replacement Process
- Order the correct pads for your rollator brand and model.
- Remove the wheel if your design allows.
- Access the brake mechanism.
- Remove old pads, usually held by a small bolt or clip.
- Install new pads and confirm alignment.
- Reattach the wheel and test.
- Adjust cable tension if needed.
Again, there is no shame in having a professional do this. It is fast, affordable, and safer if you are unsure.
Environmental Factors That Affect Brake Performance
Where and how you use the rollator affects brake maintenance for four-wheeled walkers more than most people realize.
Outdoor Use
Outdoor use brings:
- Dirt and debris
- Moisture
- Temperature swings
Solution: Wipe down wheels and visible brake parts more frequently. After rain or snow, dry everything. If you use the rollator around winter salt, cleaning is especially important.
Indoor Use
Indoor use is gentler, but still:
- Dust can build up
- Carpet fibers can wrap around axles
Solution: Regular wipe downs and periodic checks around wheels and axles.
Seasonal Considerations
Winter can be rough on cables and hardware. Salt and de-icing chemicals can speed up corrosion.
If the rollator is used in winter conditions, clean it after use and check cables more often.
Lubrication: What to Do and What to Avoid
Lubrication helps moving parts stay smooth, but the wrong lubricant in the wrong place can make brakes less effective.
What to Lubricate
- Pivot points where brake levers move
- Cable entry and exit points, lightly, following your manufacturer guidance
- Wheel axles, sparingly
What Not to Lubricate
- Brake pads
- Wheel braking surfaces
I usually prefer a silicone-based spray used lightly on non-braking parts. But if you are unsure, your rollator manual is the best guide.
Special Considerations for Seniors with Limited Hand Strength
Brake maintenance for four-wheeled walkers is not only about hardware. It is also about whether the user can operate the brakes reliably.
If squeezing is difficult because of arthritis or low grip strength, consider:
Brake Lever Extensions
These add leverage and can make levers easier to squeeze.
Ergonomic Grips
Padded or contoured grips can reduce discomfort and improve control.
Professional Assessment
An occupational therapist can help determine whether the current rollator setup is safe.
My honest take: if someone cannot reliably operate the brakes, the rollator is not safe for them. Adjust the setup, add adaptive accessories, or explore a different mobility aid.
Creating a Maintenance Schedule
Here is a practical schedule that keeps brake maintenance for four-wheeled walkers simple and consistent.
Weekly
- Squeeze test for both brakes
- Lock test
- Quick visual inspection
- Clean wheels and brake pads if visibly dirty
Monthly
- Inspect cables and hardware more closely
- Adjust cable tension if needed
- Lubricate pivot points and cable entry and exit points, avoiding pads
- Tighten loose screws and bolts
Every 6 Months
- Deep clean the brake area
- Measure brake pad thickness
- Check for cable wear
- Professional inspection if possible
Annually
- Consider replacing cables, especially with heavy outdoor use
- Replace brake pads if worn
- Full professional service
- Print this schedule or set reminders. Whatever makes it happen.
When to Call a Professional
- DIY maintenance is great, but professional help is smart when:
- You adjusted cables and brakes still do not work properly
- You see damage to the frame or brake mounts
- Cables are frayed, kinked, or rusted
- You are not confident making repairs
- The user has had a fall or near-fall related to brakes
- Medical supply stores and mobility equipment specialists can service rollator brakes, and many bike shops can help with cable-style systems.
The Bottom Line on Brake Safety
Brake maintenance for four-wheeled walkers is not complicated, but it is critical. I have seen too many people using rollators with weak brakes, not because they did not care, but because they did not realize anything was wrong.
A few minutes each week can keep brakes responsive, locks reliable, and everyday movement safer. Check them regularly, adjust cable tension when needed, replace worn parts, and get professional help when you need it.
Because at the end of the day, brakes are the difference between a confidence-building mobility aid and a rolling gamble.
Your rollator brakes are a life-saving feature. Treat brake maintenance for four-wheeled walkers like it matters, and you can roll with a lot more confidence.


One Comment
Comments are closed.